Forms
Create
Forms are the collection tools of Formcake. Every action is related to a form, and every submission from your presentation layer is associated with a form as well. Create a form now.
Form Settings
Name - The form's name is to help you distinguish between sets of data. We recommend that you create a new form for each presentation layer in your application and name them descriptively. As an example, our 404 page uses a form that we named 'Error Page Feedback Form'. This name is never exposed to an end user, but it's useful for keeping track of where your data is flowing.
Description (optional) - A form's description is just that: descriptive text that is more informative than the title.
Honeypot Field (optional) - If a submission has data in this key, we'll mark it as spam. A normal honeypot field might be in your presentation as <input type="hidden" name="my-honeypot" /> and you would put my-honeypot in this field. Normal users will never actually put data in this input, but sources of spam often will.
Success Redirect (optional) - When you use an HTML presentation layer (i.e. a <form> tag) the user's browser will redirect them to whatever URL you configure here. If you leave this field blank, by default we will redirect to https://formcake.com/submission. When you submit data to a form with JSON content instead (e.g. with fetch(...)), this field is ignored.
Whitelisted Domains (optional) - Whitelisted domains are domains that Formcake will accept when a form submission occurs. Only domains and subdomains can be whitelisted, not full urls. Full urls will be stripped down to their domain upon saving or updating a form. If no domains are added then the form is open to submissions from any source.
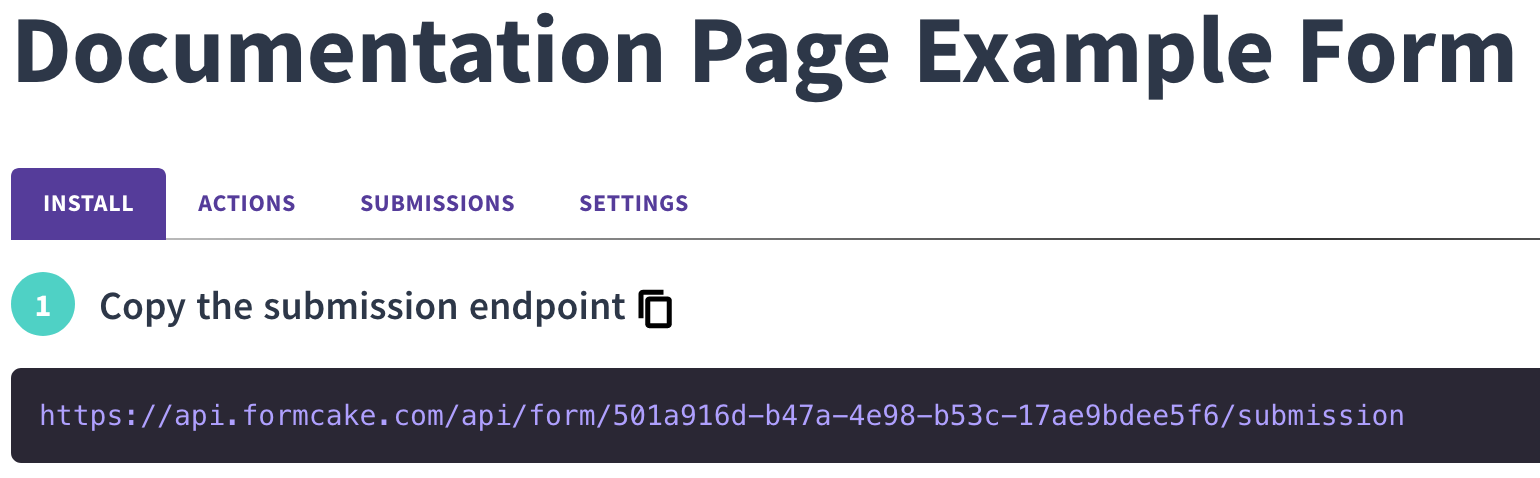
Install
Submission Endpoint
The submission endpoint is http://api.formcake.com/api/form/<form id>/submission and can be found in the install tab of your form:
HTML Presentation Layer
Put the submission endpoint in the action attribute of your <form> tag. Set the method to POST:
<form
    method="POST"
    action="https://api.formcake.com/api/form/501a916d-b47a-4e98-b53c-17ae9bdee5f6/submission"
>
Other Presentation Layers
POST to the submission endpoint. Add a Content-Type header with application/json. You can do this in native Javascript with:
const SUBMISSION_ENDPOINT = 'https://api.formcake.com/api/form/501a916d-b47a-4e98-b53c-17ae9bdee5f6/submission';
const formcakePost = (data = {}) => fetch(SUBMISSION_ENDPOINT, {
    method: 'POST',
    headers: {
        'Content-Type': 'application/json'
    },
    body: JSON.stringify(data),
});
formcakePost({example: 'data'})
    .then((response) => response.json())
    .then((data) => console.log(data));
Submission Responses
Content-Type application/x-www-form-urlencoded
When your presentation layer POSTs to a form with the application/x-www-form-urlencoded Content-Type (i.e. with an HTML presentation layer):
1. If you have a redirect configured, the browser will redirect to that URL.
2. If you do not have a redirect configured, the browser will redirect to https://formcake.com/submission.
Content-Type application/json
When your presentation layer POSTs to a form with the application/json Content-Type, Formcake will return JSON.
Success:
{
	"data": {
		"example": "data"
	},
	"id": 638,
	"formId": "501a916d-b47a-4e98-b53c-17ae9bdee5f6",
	"domain": "https://formcake.com/docs",
	"updatedAt": "2020-05-18T01:29:52.983Z",
	"createdAt": "2020-05-18T01:29:52.983Z"
}
Failure:
{
    "message": "Domain <disallowed domain> not allowed.",
    "name": "badRequestError"
}
Typically you will only receive failures when the domain you are submitting from is disallowed in your form's settings.
Files
Usage
In order to use Formcake's file upload feature, you create an HTML form in the exact way that you would any other Formcake form but include the attribute "enctype" and set it to "multipart/form-data". This allows our server backend to properly process form data with files attached. You then need an input field of type "file" in order to attach files to the submission.
Virus Scanning
A submission with files attached will take a moment to show up in your submission tab because we scan the files for viruses to ensure they are safe to use.
Example Code
Creating a simple example can be the best way to get started since files are a more of an advanced feature.<form action="https://api.formcake.com/api/form/ab5e2425-63c1-4f0b-b47f-5763fdb23412/submission" method="post" enctype="multipart/form-data">
<label for="fname">First name:</label>
<input type="text" id="fname" name="fname">
<label for="lname">Last name:</label>
<input type="text" id="lname" name="lname">
<input type="file" id="myfile" name="myfile">
<input type="submit" value="Submit">
</form>Dashboard
You can find a shareable link to the file upload in your submissions dashboard in your form view. Just click on the submission in the table to bring up the detailed view panel.

Supported Files
Note that right now only the file types jpg, gif, png, tiff, svg, txt, pdf, csv, and json are supported
Spam
Any submissions that are detected as spam will not count towards your submission limit. Additionally, they will not cause any actions to trigger.
Basic Spam Protection
Using the Honeypot Field in your Form's settings, any submission data that contains information in that field will be marked as spam. We recommend adding a hidden field in your form and using its name as your Honeypot.
Spam Protection with reCAPTCHA v3
Google's reCAPTCHA v3 can be used natively with Formcake to prevent spam. The Minimum Confidence Score you want to accept is configurable per form. To enable reCAPTCHA, you can follow the instructions below, or read Google's documentation.
- Add Google's reCAPTCHA script to your page, preferably in your <head> tag.
- Add a script that handles the form's submission.
- Add the Formcake sitekey to your form, it must be within your <form> tag
Test
Test Via Formcake
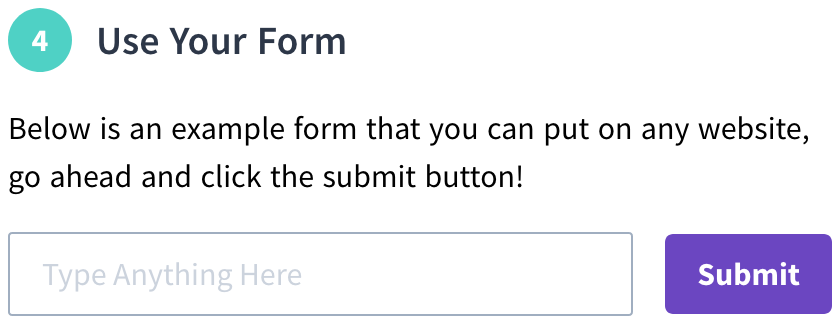
In the install tab of your form, in step 4, there's a section titled 'Use Your Form'. If you use that form to send data, it will trigger all the actions in your form and store a submission with your content inside of it.
Test Via Your Presentation Layer
As soon as you create a form, it is available for use. You can immediately begin testing your form without any delay.
Delete
Deleting a Form
When you delete a form, all associated actions and submissions are removed and are not recoverable.
You can delete a form by going to the settings tab of your form and clicking 'Delete Form'.